分类 Laravel 下的文章

Composer作为PHP的组件化管理工具,实现了laravel框架的组件安装、更新、移除,以及自动加载功能,下面就深入解析这是如何实现的。

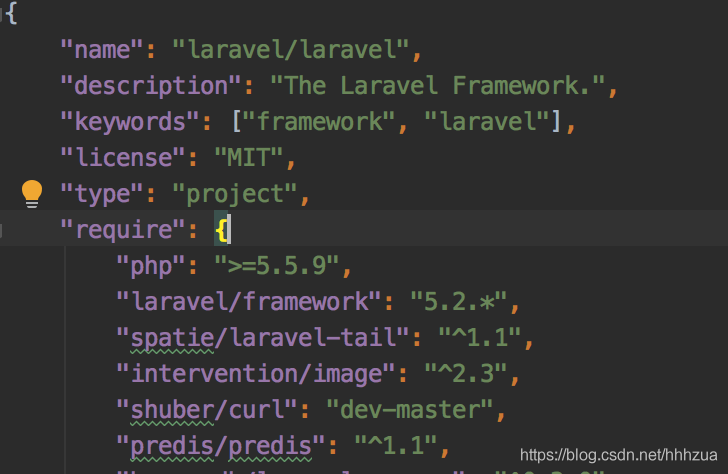
使用Composer安装组件,首先需要创建composer.json文件,composer.json示例如下:
在这里插入图片描述
我的个人博客:逐步前行STEP

该文件定义了项目的基本信息以及所依赖组件的名称、版本、再执行composer install将所依赖组件安装到项目的vendor目录中。完成安装后会自动生成 composer.lock 文件,该文件罗列了各个组件确切的版本以及安装方式:
在这里插入图片描述
当执行composer install时首先检查是否存在该文件,如果存在就下载该文件中能够规定的组件以及版本。

我的个人博客:逐步前行STEP

在安装好组件之后,vendor目录下除了组件目录还会生成一个composer目录,以及自动加载文件autoload.php
在这里插入图片描述
引入这个文件,就可以实现自动加载了,可以直接在项目中使用组件。看一下该文件的具体内容:
在这里插入图片描述

仅仅2行代码,只做了一件事:引入composer/autoload_real.php文件,也就是说,实际上实现了自动加载的代码都在composer目录中,进入该目录:
在这里插入图片描述
先查看autoload_real.php,其中被audoload.php 执行的静态函数代码如下:

我的个人博客:逐步前行STEP

public static function getLoader()
    {
        if (null !== self::$loader) {
            return self::$loader;
        }

        spl_autoload_register(array('ComposerAutoloaderInit67db00000000012c704d3566', 'loadClassLoader'), true, true);
        self::$loader = $loader = new \Composer\Autoload\ClassLoader();
        spl_autoload_unregister(array('ComposerAutoloaderInit67db00000000012c704d3566', 'loadClassLoader'));

    ......
    }

在这个方法中,spl_autoload_register 函数用于注册给定的函数作为 __autoload 的实现,上述代码注册的__autoload实现是loadClassLoader方法:

    public static function loadClassLoader($class)
    {
        if ('Composer\Autoload\ClassLoader' === $class) {
            require __DIR__ . '/ClassLoader.php';
        }
    }

该方法引入了ClassLoader.php,随后 getLoader() 方法实例化ClassLoader 并且使用spl_autoload_unregister注销了该__autoload实现,之后的二十多行代码实现了自动加载,在解析这部分代码之前,需要先了解php规范

PSR 是 PHP Standard Recommendations (PHP 推荐标准)的简写,由 PHP FIG 组织制定的 PHP 规范,是 PHP 开发的实践标准。其中:

   PSR-0:自动加载标准,2014-10-21该标准已经被废弃,使用PSR-4替    代,不再细讲
   PSR-4:自动加载

PSR-0 和 PSR-4 的自动加载规范,虽然PSR-0已经弃用,但是Composer仍然兼容PSR-0,具体规范如下:
1、PSR-0

一个标准的 命名空间 (namespace) 与 类 (class) 名称的定义必须符合以下结构: <Vendor Name>(<Namespace>)*<Class Name>;

其中 Vendor Name 为每个命名空间都必须要有的一个顶级命名空间名;
需要的话,每个命名空间下可以拥有多个子命名空间;
当根据完整的命名空间名从文件系统中载入类文件时,每个命名空间之间的分隔符都会被转换成文件夹路径分隔符;
类名称中的每个 字符也会被转换成文件夹路径分隔符,而命名空间中的 字符则是无特殊含义的。
当从文件系统中载入标准的命名空间或类时,都将添加 .php 为目标文件后缀;
组织名称(Vendor Name)、命名空间(Namespace) 以及 类的名称(Class Name) 可由任意大小写字母组成。

范例:

DoctrineCommonIsolatedClassLoader => /path/to/project/lib/vendor/Doctrine/Common/IsolatedClassLoader.php
namespacepackageClass_Name => /path/to/project/lib/vendor/namespace/package/Class/Name.php

namespacepackage_nameClass_Name => /path/to/project/lib/vendor/namespace/package_name/Class/Name.php

2、PSR-4

1、术语「class」指的是类(classes)、接口(interfaces)、特征(traits)和其他类似的结构。
2、全限定类名具有以下形式:

 \<NamespaceName>(\<SubNamespaceNames>)*\<ClassName>
 2.1、全限定类名必须拥有一个顶级命名空间名称,也称为供应商命名空间(vendor namespace)。
2.2、全限定类名可以有一个或者多个子命名空间名称。
2.3、全限定类名必须有一个最终的类名(我想意思应该是你不能这样 \<NamespaceName>(\<SubNamespaceNames>)*\ 来表示一个完整的类)。
2.4、下划线在全限定类名中没有任何特殊含义(在 PSR-0 中下划是有含义的)。
2.5、全限定类名可以是任意大小写字母的组合。
2.6、所有类名的引用必须区分大小写。

我的个人博客:逐步前行STEP

范例:

全限定类名命名空间前缀根目录对应的文件路径
AcmeLogWriterFile_WriterAcmeLogWriter./acme-log-writer/lib/./acme-log-writer/lib/File_Writer.php
AuraWebResponseStatusAuraWeb/path/to/aura-web/src//path/to/aura-web/src/Response/Status.php

而在composer.josn文件中,autoload 键下定义了当前组件的自动加载实现方式,就包含了psr-4、psr-0:

    "autoload": {
        ......
        "psr-4": {
            "App\\": "app/",
            "ApolloPY\\Flysystem\\AliyunOss\\": "packages/apollopy/flysystem-aliyun-oss/src/",
            "Thrift\\": "packages/php/lib/",
        },
        "psr-0": {
          "Maatwebsite\\Excel\\": "src/"
        }
        ......
    },

了解上述PSR规范的基础后,我们再回到Composer自动加载的引导类 的getLoader() 方法来,接着看实例化了 核心类 ClassLoader 之后的代码:

public static function getLoader()
    {
        ......

        $useStaticLoader = PHP_VERSION_ID >= 50600 && !defined('HHVM_VERSION') && (!function_exists('zend_loader_file_encoded') || !zend_loader_file_encoded());
        if ($useStaticLoader) {
            require_once __DIR__ . '/autoload_static.php';

            call_user_func(\Composer\Autoload\ComposerStaticInit67db7509c61e60a4f92e012c704d3566::getInitializer($loader));
        } else {
            $map = require __DIR__ . '/autoload_namespaces.php';
            foreach ($map as $namespace => $path) {
                $loader->set($namespace, $path);
            }

            $map = require __DIR__ . '/autoload_psr4.php';
            foreach ($map as $namespace => $path) {
                $loader->setPsr4($namespace, $path);
            }

            $classMap = require __DIR__ . '/autoload_classmap.php';
            if ($classMap) {
                $loader->addClassMap($classMap);
            }
        }

        $loader->register(true);

        if ($useStaticLoader) {
            $includeFiles = Composer\Autoload\ComposerStaticInit67db7509c61e60a4f92e012c704d3566::$files;
        } else {
            $includeFiles = require __DIR__ . '/autoload_files.php';
        }
        foreach ($includeFiles as $fileIdentifier => $file) {
            composerRequire67db7509c61e60a4f92e012c704d3566($fileIdentifier, $file);
        }

        return $loader;
    }

这部分代码先是判断当前版本是否>=5.6 ,且不是HHVM虚拟机,满足条件则引入autoload_static.php 进行初始化:

call_user_func(\Composer\Autoload\ComposerStaticInit67db7509c61e60a4f92e012c704d3566::getInitializer($loader));

autoload_static.php文件中,定义了5个数组:

在这里插入图片描述
我的个人博客:逐步前行STEP

依次是:
1、全局文件列表

......
    public static $files = array (
        '0e6d7bf4a5811bfa5cf40c5ccd6fae6a' => __DIR__ . '/..' . '/symfony/polyfill-mbstring/bootstrap.php',
        '1d1b89d124cc9cb8219922c9d5569199' => __DIR__ . '/..' . '/hamcrest/hamcrest-php/hamcrest/Hamcrest.php',
        '667aeda72477189d0494fecd327c3641' => __DIR__ . '/..' . '/symfony/var-dumper/Resources/functions/dump.php',
        'a0edc8309cc5e1d60e3047b5df6b7052' => __DIR__ . '/..' . '/guzzlehttp/psr7/src/functions_include.php',
......

2、PSR-4规范的顶级命名空间=》路径映射的索引列表,这个列表是二维数组,第一维以首字母为键,第二维以命名空间为为键,值是命名空间的长度:

    ......
    public static $prefixLengthsPsr4 = array (
        'p' => 
        array (
            'phpDocumentor\\Reflection\\' => 25,
        ),
        'h' => 
        array (
            'hegzh\\AliyunCore\\' => 17,
            'h4cc\\WKHTMLToPDF\\' => 17,
        ),
        ......

该数组以首字母为键是为了方便查找,而最终的值是命名空间长度则是为了在$prefixDirsPsr4数组中查找到命名空间之后替换
3、PSR-4规范的顶级命名空间=》路径的映射列表

    ......
    public static $prefixDirsPsr4 = array (
        'phpDocumentor\\Reflection\\' => 
        array (
            0 => __DIR__ . '/..' . '/phpdocumentor/reflection-common/src',
            1 => __DIR__ . '/..' . '/phpdocumentor/reflection-docblock/src',
            2 => __DIR__ . '/..' . '/phpdocumentor/type-resolver/src',
        ),
    ......

4、PSR-0规范的顶级命名空间与路径的映射列表,该列表同样是以首字母为键:

    ......
    public static $prefixesPsr0 = array (
        'S' => 
        array (
            'SimpleSoftwareIO\\QrCode\\' => 
            array (
                0 => __DIR__ . '/..' . '/simplesoftwareio/simple-qrcode/src',
            ),
        ),
    ......

5、composer.json中classmap方式定义的自动加载目录:

    public static $classMap = array (
        'Adbar\\Dot' => __DIR__ . '/..' . '/adbario/php-dot-notation/src/Dot.php',

否则,引入autoload_namespaces.php、autoload_psr4.php、autoload_classmap.php 这三个文件。

autoload_namespaces.php 文件文件指定了顶级命名空间到file path的映射:
在这里插入图片描述
autoload_psr4.php文件同样是指定了顶级命名空间到file path的映射,和autoload_namespaces.php的区别在于,autoload_namespaces.php是写入了composer.json中设置了psr-0规范的命名空间与路径映射,如:

......
"autoload": {
    "classmap": [
      "src/Maatwebsite/Excel"
    ],
    "psr-0": {
      "Maatwebsite\\Excel\\": "src/"
    }
  },
......

autoload_psr4.php是写入了composer.json中设置了psr-4规范的命名空间与路径映射,如:

......
    "autoload": {
        "psr-4": {
            "ProductAI\\": "src/"
        }
    },
......

而autoload_classmap.php文件,则是在Composer安装、更新或者执行composer dump-autoload 时会扫描autoload_psr4.php、autoload_namespaces.php文件中定义的顶级命名空间对应的目录以及composer.json中设置了classmap自动加载方式的目录,如:

    ......
    "autoload": {
        "classmap": [
            "database",
            "app/Interfaces"
        ],
    ......

扫描各个目录下的php文件并且将文件中的类名与当前目录映射写入该文件,如:

<?php

// autoload_classmap.php @generated by Composer

$vendorDir = dirname(dirname(__FILE__));
$baseDir = dirname($vendorDir);

return array(
    ......
    'AlibabaCloud\\Aas\\V20150701\\AasApiResolver' => $vendorDir . '/alibabacloud/sdk/src/Aas/V20150701/AasApiResolver.php',
    'AlibabaCloud\\Aas\\V20150701\\CreateAccessKeyForAccount' => $vendorDir . '/alibabacloud/sdk/src/Aas/V20150701/AasApiResolver.php',
    'AlibabaCloud\\Aas\\V20150701\\CreateAliyunAccount' => $vendorDir . '/alibabacloud/sdk/src/Aas/V20150701/AasApiResolver.php',
    'AlibabaCloud\\Aas\\V20150701\\CreateAliyunAccountWithBindHid' => $vendorDir . '/alibabacloud/sdk/src/Aas/V20150701/AasApiResolver.php',
    ......
);

引入这三个文件之后,ClassLoader对象将文件中的映射设置到对应的属性中:

    ......
    $map = require __DIR__ . '/autoload_namespaces.php';
    foreach ($map as $namespace => $path) {
        $loader->set($namespace, $path);
    }
    ......

接着,ClassLoader对象调用了register()方法注册了__autoload实现:

    public function register($prepend = false)
    {
        spl_autoload_register(array($this, 'loadClass'), true, $prepend);
    }

而这个loadClass()方法的工作原理其实是在ClassLoader对象的设置了类名与路径的属性中查找并且引入文件:

......
    public function loadClass($class)
    {
        if ($file = $this->findFile($class)) {
            includeFile($file);

            return true;
        }
    }
......

到这一步,自动加载的主要工作已经完成了,但是Composer 不止可以自动加载命名空间,还可以加载全局函数,根据是否版本>=5.6且不是HHVM虚拟机,分为静态初始化和动态初始化:

if ($useStaticLoader) {
            $includeFiles = Composer\Autoload\ComposerStaticInit67db7509c61e60a4f92e012c704d3566::$files;
        } else {
            $includeFiles = require __DIR__ . '/autoload_files.php';
        }
        foreach ($includeFiles as $fileIdentifier => $file) {
            composerRequire67db7509c61e60a4f92e012c704d3566($fileIdentifier, $file);
        }

我的个人博客:逐步前行STEP

以上就是自动加载的核心功能,总结一下,主要流程如下:
1、引入autoload.php
2、引入autoload_real.php
3、注册loadClassLoader作为自动加载实现, 并实例化 ClassLoader,而后注销loadClassLoader
4、版本>=5.6且未使用HHVM则使用静态初始化,否则引入autoload_namespaces.php、autoload_psr4.php、autoload_classmap.php将 类名=》路径的映射设置到ClassLoader对象属性中
5、注册 loadClass 作为自动加载实现,loadClass的实现原理就是在类名=》路径的映射中查找并引入文件
6、将全局函数文件遍历引入

1、如果是使用Eloquent ORM操作数据库的话,在sql查询时可以调用toSql()方法来获取sql:

    App\User::where('name','like','%hezehua%')->toSql();

2、如果是执行原生Sql查询,则不能使用toSql()方法了,而是开启查询日志:

    DB::enableQueryLog();
    DB::sselect("select * from users limit 10");
    $log = DB::getQueryLog();

如果当前请求可能会建立多个连接,可以指定在某一个连接中获取查询日志,未指定的话将从最近一个连接中获取查询日志:

    DB::connection($con)->enableQueryLog();

我的个人博客:逐步前行STEP

服务提供者是一个有效的将工具与业务解耦的方案,下面结合一个实用案例来解释服务提供者在实现提供基础服务的工具中的应用。

服务提供者

服务提供者是 Laravel 应用启动的中心,所有 Laravel 的核心服务都是通过服务提供者启动,通过使用服务提供者来管理类的依赖和执行依赖注入,可以很好地将一些底层服务与应用层代码解耦。

短信服务

短信服务对于一个系统来说,是基础的、通用的服务,不依赖于业务细节,所以应该将其与业务解耦。

系统设计

将不同服务商的sdk称为驱动,短信服务应该满足以下需求:

  1. 可替换驱动
  2. 驱动实例化对使用者透明

1、可替换驱动

要满足第1点,首先应该使用接口约束对外暴露的方法,只有驱动满足接口约束,才能不影响业务直接替换驱动,于是设计接口:

<?php

namespace App\Interfaces;

Interface SmsDriverInterface
{

    public function sendMessage($phones, $template_id, $parameters);
}

如果接入的厂商是七牛云,则创建七牛云短信驱动,并在驱动中调用SDK实现功能:

<?php
namespace App;

use Qiniu\Auth;
use Qiniu\Http\Client;
use Qiniu\Http\Error;
use Qiniu\Sms\Sms;
class QiniuDriver implements SmsDriverInterface
{
    const HOST = 'https://sms.qiniuapi.com';

    const VERSION = 'v1';
    public function __construct()
    {
        $this->auth  = new Auth(config('access_key'), config('secret_key'));

        $this->sms = new Sms($this->auth);
    }
 
    public function sendMessage($phones, $template_id, $parameters = [])
    {
        $phones = array_map(function($item)
        {
            if(!is_string($item))
            {
                $item = strval($item);
            }

            return $item;
        }, $phones);

        $ret = $this->sms->sendMessage($template_id, $phones, $parameters);

        $result = $this->getResultApiRet($ret);

        return $result;
    }
}

别的厂商的驱动也这样实现接口SmsDriverInterface,在更换厂商的时候,换一个驱动实例化就可以了。

2、驱动实例化对使用者透明

此处的使用者就是使用短信服务实现业务需求的工程师啦,因为短信服务的基础、通用的特性,会被在业务中很多地方使用,如果更换驱动的话,会涉及很多具体业务代码的修改,所以需要创建一个服务类,用来统筹驱动的使用,具体业务中再调用这个服务类,驱动的实例化就对业务透明了:

<?php
namespace App;
class SmsService
{
    public $driver;
    
    public function driver($driver_name)
    {
        switch($driver_name)
        {
            case 'qiniu':
                $this->driver = new QiniuDriver();
            break;
            case 'aliyun':
                $this->driver = new AliyunDriver();
            break;
        }
    }
    
    public function senndMessage($phone, $template_id)
    {
        return $this->driver->sendMessage($phone, $template_id);
    }
} 

再做改进,将传参选择驱动类型改为从配置中获取驱动类型:

<?php
namespace App;
class SmsService
{
    public $driver;
    
    public function driver()
    {
        switch(config('driver'))
        {
            case 'qiniu':
                $this->driver = new QiniuDriver();
            break;
            case 'aliyun':
                $this->driver = new AliyunDriver();
            break;
        }
    }
    ......
}

至此,基本满足了刚才所说的2点基本需求,但是,在增加驱动的时候要去改动driver()中的代码,增加其它驱动项,在服务类中枚举出所有的驱动似乎不够简洁,这里可以使用服务提供者再做优化:

<?php

namespace App\Providers;

use App\Interfaces\SmsDriverInterface;
use App\NullSms;
use App\QiniuSms;
use App\SmsService;
use Illuminate\Support\ServiceProvider;

class SmsServiceProvider extends ServiceProvider
{

    protected $defer = true;

    /**
     * Bootstrap the application services.
     *
     * @return void
     */
    public function boot()
    {

    }

    /**
     * Register the application services.
     *
     * @return void
     */
    public function register()
    {
        $this->app->singleton(SmsDriverInterface::class, function ($app) {

            switch(config('driver'))
            {
                case 'qiniu':
                    return new QiniuDriver();
            }

            return new NullSms();
        });
    }

    public function provides()
    {
        return [SmsDriverInterface::class];
    }
}

这里将驱动接口与配置中指定的具体驱动绑定,在服务类中的实例化方式可以改成依赖注入,因为短信驱动应该使用单例并且为了调用短信服务方便,将服务类中方法改为静态方法:

namespace App;
class SmsService
{
    public $driver;
    
    public function __construct(SmsDriverInterface $driver)
    {
        $this->driver = $driver;
    }
    
    public static function driver()
    {
        return app(self::class)->driver;
    }
    public static function sendMessage($phone, $template_id)
    {
        return SmsSend::driver()->sendMessage($phone, $template_id);
    }
}

最后将短信服务提供者添加到config/app.php文件的providers列表中,短信服务者的开发就完成了。

在这个案例中,短信服务提供者通过服务容器的依赖注入,实现了驱动在服务类中的自动实例化,在逻辑上将底层驱动与上层服务解耦。

这个案例比较简单,还有很多可以完善的地方,比如,不在服务提供者中能够使用switch去匹配驱动类型,而是增加一个驱动管理器,根据命名规则去实例化对应的驱动,这样的话就达到了增加并更换驱动的时候,只增加驱动类,以及更换config配置,就能“平滑”替换驱动的目的。

我的个人博客:逐步前行STEP

使用Goutte + GuzzleHttp 爬取网页时,如下代码中的请求头设置无效:

$jar = CookieJar::fromArray([
            "HMACCOUNT" => 'C0CDC28BD0110387',
        ], self::$host);

        $client = new GoutteClient();

        $guzzle_client = new GuzzleClient([
            'timeout'=>20,
            'headers'=>[
                'Referer'=>$prefix_url,
                'User-Agent'=>'Mozilla/5.0 (Macintosh; Intel Mac OS X 10_13_6) AppleWebKit/537.36 (KHTML, like Gecko) Chrome/76.0.3809.100 Safari/537.36',
            ],
            'cookies' => $jar,
            'debug'=>true,
        ]);

        $client->setClient($guzzle_client);

经过研究源码发现,User-Agent 请求字段使用了默认值,没有应用传入的参数,而cookies配置则因为语法问题被覆盖丢失。

以下是具体探究过程:
vendor/symfony/browser-kit/Client.php中:


......
    /**
     * @param array     $server    The server parameters (equivalent of $_SERVER)
     * @param History   $history   A History instance to store the browser history
     * @param CookieJar $cookieJar A CookieJar instance to store the cookies
     */
    public function __construct(array $server = [], History $history = null, CookieJar $cookieJar = null)
    {
        $this->setServerParameters($server);
        $this->history = $history ?: new History();
        $this->cookieJar = $cookieJar ?: new CookieJar();
    }
......
    /**
     * Sets server parameters.
     *
     * @param array $server An array of server parameters
     */
    public function setServerParameters(array $server)
    {
        $this->server = array_merge([
            'HTTP_USER_AGENT' => 'Symfony BrowserKit',
        ], $server);
    }
......

设置了$this->sever的初始值,然后在该文件的:

public function request(string $method, string $uri, array $parameters = [], array $files = [], array $server = [], string $content = null, bool $changeHistory = true)
    {
......

        $server = array_merge($this->server, $server);
......
        $this->internalRequest = new Request($uri, $method, $parameters, $files, $this->cookieJar->allValues($uri), $server, $content);
......
        if ($this->insulated) {
            $this->response = $this->doRequestInProcess($this->request);
        } else {
            $this->response = $this->doRequest($this->request);
        }
......

如果Goutte 的 request 中没有设置相同键的sever ,生成的请求对象的sever属性就初始化包含HTTP_USER_AGENT(因为当前需求是在实例化的时候传参作为全局配置,不考虑在request之前设置header来使配置生效的方案),而在vendor/fabpot/goutte/Goutte/Client.php中:

protected function doRequest($request)
    {
        $headers = array();
        foreach ($request->getServer() as $key => $val) {
            $key = strtolower(str_replace('_', '-', $key));
            $contentHeaders = array('content-length' => true, 'content-md5' => true, 'content-type' => true);
            if (0 === strpos($key, 'http-')) {
                $headers[substr($key, 5)] = $val;
            }
            // CONTENT_* are not prefixed with HTTP_
            elseif (isset($contentHeaders[$key])) {
                $headers[$key] = $val;
            }
        }
......
        if (!empty($headers)) {
            $requestOptions['headers'] = $headers;
        }
......
        // Let BrowserKit handle redirects
        try {
            $response = $this->getClient()->request($method, $uri, $requestOptions);
            }
......

可见,Request的sever属性被用于作为GuzzleHttp实例的请求头,不过在上面的代码中,键 HTTP_USER_AGENT 已经被更改为user-agent,而从vendor/guzzlehttp/guzzle/src/Client.php文件可以看出 GuzzleHttp 实例的request方法调用了requestAsync方法,requestAsync中将上面代码传入的$requestOptions 作为请求头字段,在该文件中,从构造器可知,本文第一段代码中传入构造器的参数都会作为配置使用,在方法configureDefaults和prepareDefaults都有做处理,并将传入的请求头从以header为键换成了以_conditional为键:

private function prepareDefaults($options)
    {
        $defaults = $this->config;

        if (!empty($defaults['headers'])) {
            // Default headers are only added if they are not present.
            $defaults['_conditional'] = $defaults['headers'];
            unset($defaults['headers']);
        }
......
}

vendor/guzzlehttp/guzzle/src/Client.php的:

private function applyOptions(RequestInterface $request, array &$options)
{
......

        // Merge in conditional headers if they are not present.
        if (isset($options['_conditional'])) {
            // Build up the changes so it's in a single clone of the message.
            $modify = [];
            foreach ($options['_conditional'] as $k => $v) {
                if (!$request->hasHeader($k)) {
                    $modify['set_headers'][$k] = $v;
                }
            }
......

查找了_conditional数据是否在Request对象的请求头中存在,不存在就新增,至此,User-Agent配置失效的原因出来了,就是在此处被丢弃了,作如下修改,将传入的参数覆盖默认参数:

private function applyOptions(RequestInterface $request, array &$options)
{
......

        // Merge in conditional headers if they are not present.
        if (isset($options['_conditional'])) {
            // Build up the changes so it's in a single clone of the message.
            $modify = [];
            foreach ($options['_conditional'] as $k => $v) {
                if (!$request->hasHeader($k)) {
                //改动此处
                    $modify['set_headers'][$k] = $v;
                }
            }
......

这样,User-Agent配置就可以被正确使用了。

然而,设置的cookie还是无效,
继续调试源码,可以发现,在vendor/guzzlehttp/guzzle/src/Client.php的prepareDefaults 函数:

private function prepareDefaults($options)
    {
......
        // Shallow merge defaults underneath options.
        $result = $options + $defaults;
......        return $result;
    }

有一个合并数组的语句 $result = $options + $defaults;,但是,经过测试,该语句没有进行数组合并,我的php版本是7.1.3,这个应该跟版本有关,暂时没有查资料看具体适用于什么版本,我这儿直接改了就好了,类似还有该文件的另一处地方:

private function configureDefaults(array $config)
    {
......
        $this->config = $config + $defaults;
......

将其改成:

private function configureDefaults(array $config)
    {
......
        $this->config = array_merge($defaults, $config);
......

即可(array_merge中注意两个数组的顺序)。

我的个人博客:逐步前行STEP

1、$exist

查询 是否存在这个字段

//查询所有存在标签你字段的博客
App\Blog::where('tags','$exist',true)->get()

2、$in

查询 是否存在 【数组字段中的元素在列表中出现】

//查询所有包含标签tag_a或者tag_b的博客
App\Blog::whereRaw(['tags'=>['$in'=>["tag_a","tag_b"]]])->get()

3、$all

查询 是否存在 【数组字段中的元素全部在列表中】

//查询所有包含标签tag_a和tag_b的博客
App\Blog::whereRaw(['tags'=>['$all'=>["tag_a","tag_b"]]])->get()

4、$size

查询数组字段 tags 满足指定元素个数的文档

App\Blog::where('tags', 'size', 3)->get();

5、$where

条件过滤语句

App\Blog::whereRaw(['$where'=>'this.image_cnt = this.verify_image_cnt'])->get()